On this page
The Pierre Intercom solution provides a comprehensive and smart way to manage access control and communication through advanced intercom systems. By integrating with the Pierre system, the intercom offers seamless functionality for both security and convenience.
The Pierre Intercom outdoor unit can be paired with Pierre indoor display units that serve as both intercom control panels and Wave gateways. These indoor units not only allow for video and audio communication with visitors, but also enable integration with the wider Pierre Wave ecosystem, facilitating control of other Zigbee-based devices in the home. This dual functionality ensures seamless communication and connectivity across the smart home system.
Key Features:
- Remote Communication and Unlocking:
The Pierre intercom allows users to answer calls remotely via their smartphone. When someone rings the intercom, users can communicate directly and unlock the door from anywhere using the Pierre app. - Screenshot and Logging:
When the doorbell rings, the intercom automatically captures a screenshot of the visitor. This image is logged in the Pierre system, allowing users to view a record of visitors and maintain a security log for future reference. - Multi-Mode Unlocking:
The intercom supports multiple unlocking methods, including facial recognition, QR code, password, and IC card unlocking, offering flexibility and convenience for access control. - Face Recognition:
The intercom is equipped with advanced facial recognition technology, allowing for touchless and secure access control. This feature enhances security by ensuring that only authorized individuals can gain entry. - SIP-Based Communication:
The intercom operates using the SIP protocol, allowing it to communicate seamlessly with other systems within the Pierre ecosystem, such as guard stations or management centers, ensuring comprehensive control and security integration. - Event Logging and Notifications:
The system provides real-time notifications when someone rings the intercom and logs each event in the Pierre app, ensuring that users are always aware of activity at their door. - Outdoor Durability:
Designed for outdoor use, the intercom features infrared night vision, high luminance LED lighting, and is built to withstand various weather conditions, ensuring reliability in any environment .
The Pierre Intercom Solution combines security, convenience, and advanced technology, making it ideal for modern residential and commercial properties.
Pierre INTERCOMS
The Pierre Intercoms are SIP-based, operating on the "offline-first" principle. This means that the system initially establishes a connection through the local network. If internet access is available, remote access becomes possible. For SIP-based systems, a dedicated server is not strictly necessary.
A network router is a fundamental and essential component of the Pierre door entry system. The modem-router provided by internet service providers is suitable for this purpose.
The router must be configured with a DHCP server range depending on the size of the project.
Example:
For a residential building with 50 apartments:
- Router IP address: 192.168.1.100
- IP addresses for the internal units of the Pierre door entry system in apartments:
- Apartment 1: 192.168.1.1
- Apartment 6: 192.168.1.6
- Apartment 50: 192.168.1.50
- The DHCP server IP range to be configured on the router: 192.168.1.101 - 192.168.1.254
Role setup for Pierre intercoms for residential building
Pierre intercom has to be added to the Common controller on separate role.
Every apartment has to have access to the intercom and the appropriate door to unlock with the intercom. Intercom and door has to be on a separate role called Intercom and excluded from the default Role. This new role, called Intercom, must be added to the Pierre displays (intercom's indoor unit) and to those users who we want to be able to ring the intercom.
Pierre BOSTON Setup
Every Pierre Display Requires a Fixed IP Address
For optimal functionality and reliable performance, all Pierre displays must be assigned a fixed IP address. This ensures seamless communication and avoids potential conflicts within the network.
Setup in Pierre Partner Application
Menu - Intercoms - Add
Select the Pierre Intercom
Choose the Pierre Intercom from the available options.
Configure the Intercom Settings
- Name: Enter a custom name of your choice.
- Role: Select the appropriate role for the intercom.
- Doors: Specify which doors can be opened by the intercom.
Save the Configuration
After saving, click on the newly created intercom to view or modify settings.
Access Parameters
Navigate to the Parameters tab to find the configuration settings for the Pierre Intercom. These settings are automatically generated by the system and can be adjusted as needed.
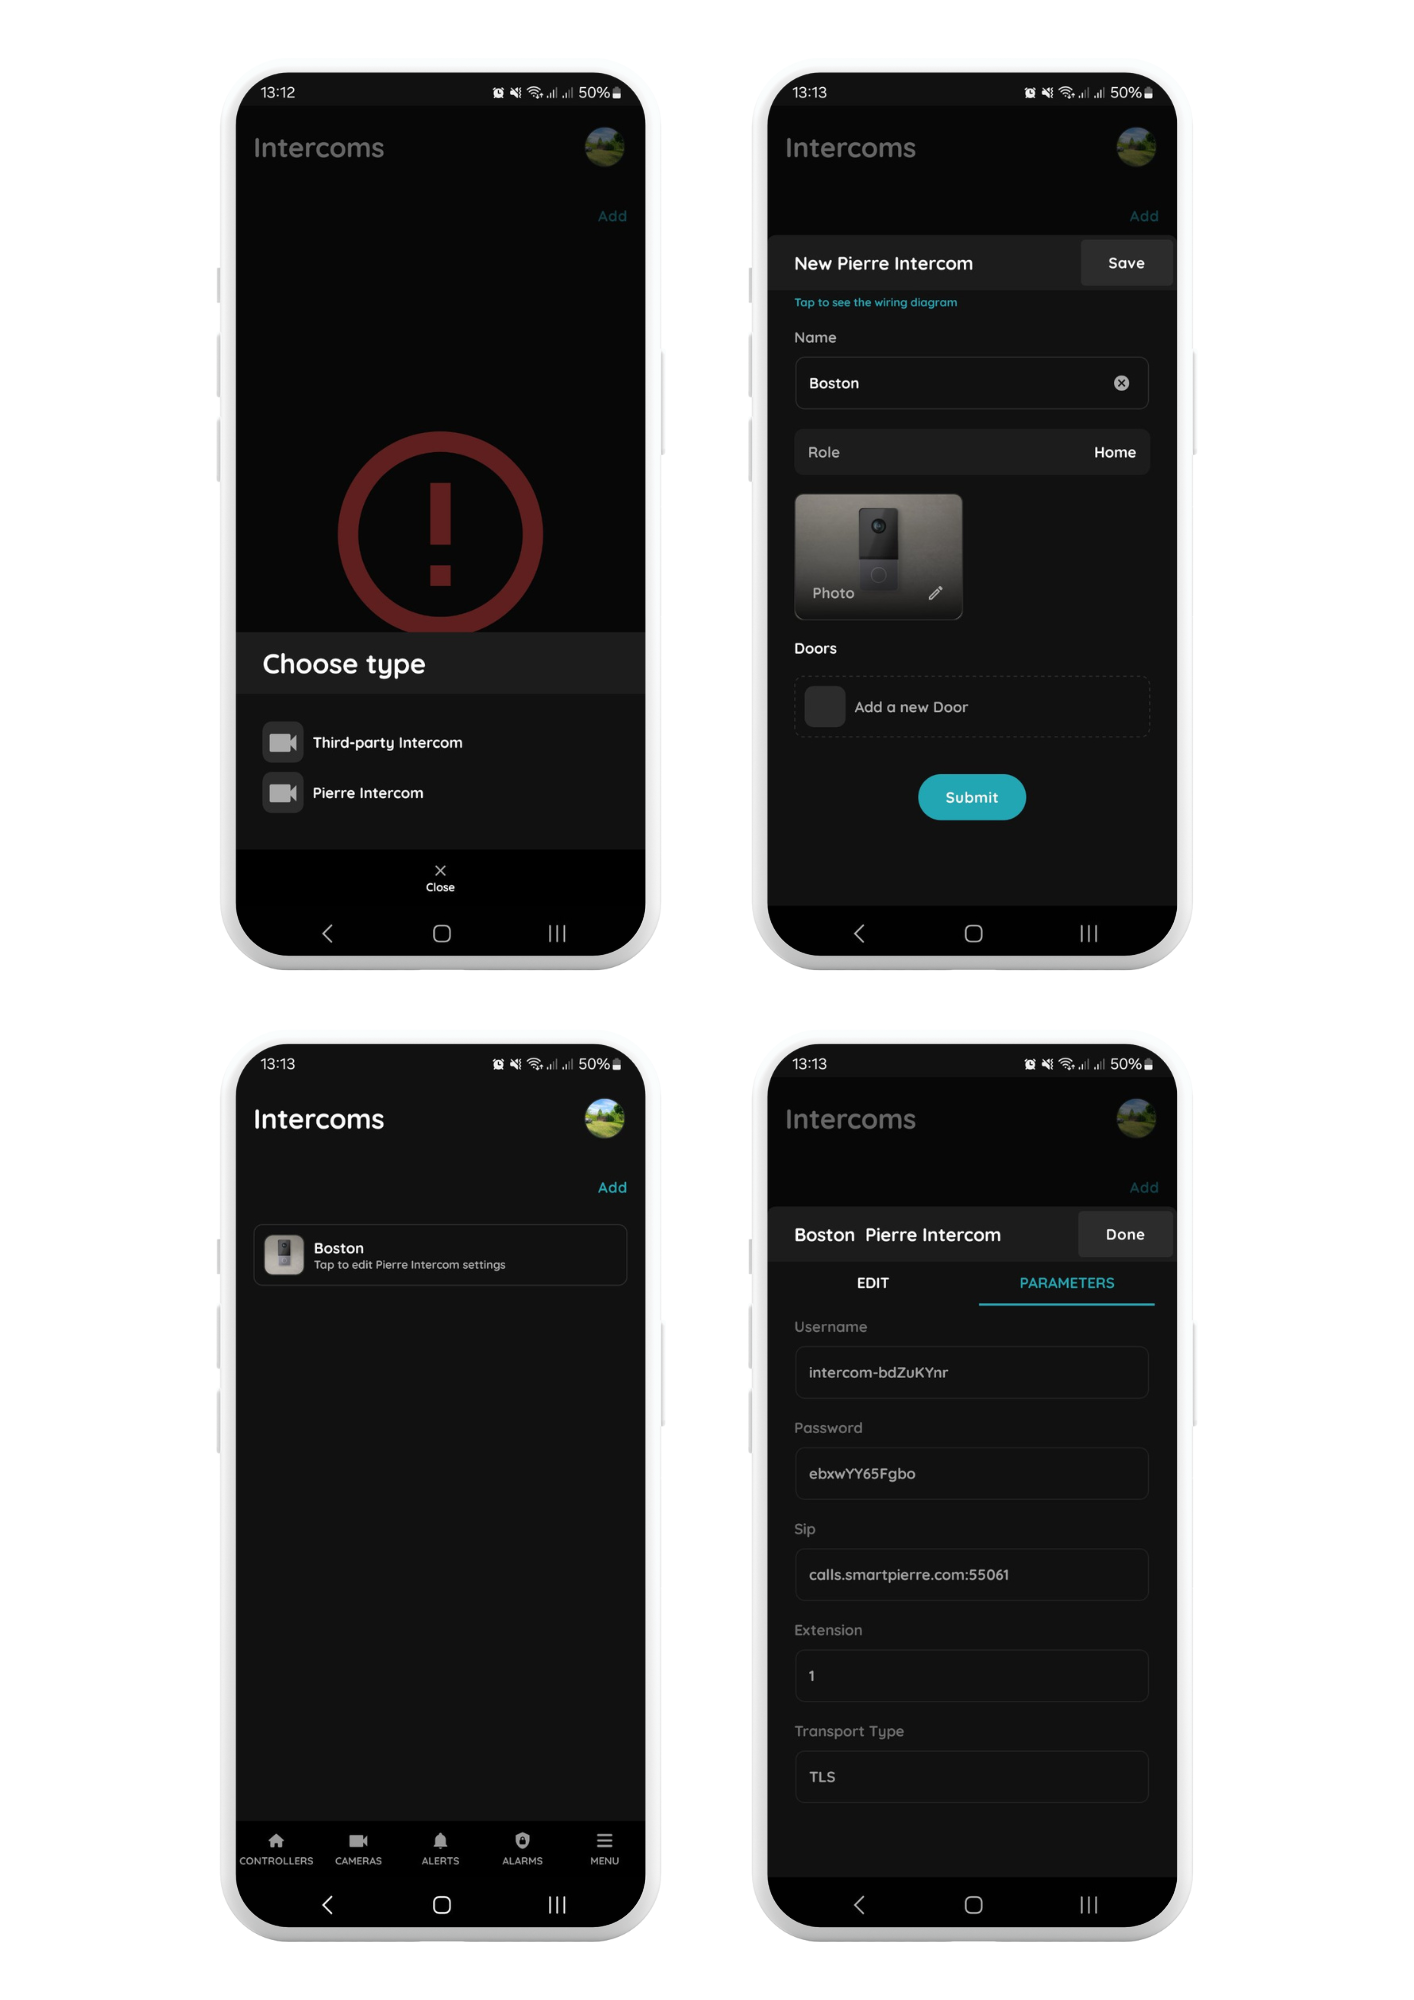
The following parameters are automatically generated and must be set in the Pierre intercom:
- Username - type in as shown in the Pierre Partner application
- Password - type in as shown in the Pierre Partner application
- SIP - Pierre SIP server parameters
- Extension - 1 (When there are multiple intercoms in the system, the system automatically increments this parameter to accommodate the additional devices.
- Transport Type - TLS
Setup the Pierre Boston Intercom:
1. Settings
- Click on the Settings icon.
- The default password is 801801.
Important: Always change this password at the end of the setup process and document it securely.
2. Call Settings
- Call Settings and then navigate to the SIP Account Settings section.
3. SIP Account Configuration
- Username: this is the EXTENSION from Pierre Partner application (e.g. 1).
- Local SIP Account - This is automatically generated by the system. No changes are required.
Format: sip:1@ip-address:5060
SIP Account 1
- Remark: name of the intercom
- Username: Enter the Username generated in the Pierre Partner application.
- Server Password: Use the Password generated in the Pierre Partner application.
- Server Address: calls.smartpierre.com
- Server Port: 55061
- Transfer Method: Set to TLS (Transport Layer Security) ensure compatibility with the Yettel network and every other provider that uses Double NAT.
4. Save and Verify Connection
- Save the settings and exit the menu.
- Re-enter the SIP Account Settings to confirm the status.
- The status should now display Connected.
This ensures the intercom is properly configured and connected for secure and efficient operation.
Configuring the Call Recipients on the Door Intercom
Step 1: Access the Intercom Settings
- On the intercom, go to Settings.
- Enter the default password: 801801.
Step 2: Navigate to Call Settings
- Select Call Settings.
- Enable Resident List Call.
- Open Contact List Management.
- Choose Add to and then Add Contacts.
Step 3: Add a New Contact
- Remark: Provide a clear identifier, e.g.:
- Apartment 1 - John Doe
- SIP Account: Enter the SIP URL in the following format:
- sip:1@192.168.1.1 (local IP of the Pierre Display)
- Save the contact by clicking SAVE.
Example: for Apartment 13 the displays IP address should be 192.168.1.13, the SIP account will be sip:1@192.168.1.13
Routers IP address should set to 192.168.1.100, dhcp server range from 192.168.1.101 - 250.
sip:1@ representing the identifier of the Pierre Intercoms in the building. In case there are two intercoms in the building, the second intercoms identifier will be sip:2@
Step 4: Test the Call
- Once the contact is added, test the call functionality to ensure proper connection and communication.
Assigning Fixed IP Addresses to Displays
Step 1: Access Network Settings
- On the display, pull down the status bar from the top of the screen.
- Connect the Pierre display to the internet using a Wi-Fi network (this is optional and not required for door intercom functionality).
- Use Ethernet for internal network communication of the intercom system.
Step 2: Configure Ethernet for Internal Communication
- Use Ethernet for internal network communication with the intercom system.
- Check Primary network. There are two ways to configure this:
- If the displays only have LAN access, it is essential to enable the Primary Network in the display’s Ethernet settings.
- Alternatively, if the apartment has its own internet access via a Wi-Fi network, and the Ethernet connection is used for the intercom on the display, then the Wi-Fi network must be set as the Primary Network in the Wi-Fi settings.
- Navigate to IP Settings and select Static.
Step 3: Assign Fixed IP Address
- IP Address:
- Assign a fixed IP address that is outside of the DHCP range to avoid conflicts.
- Gateway:
- Enter the IP address of the network gateway (typically the router’s IP address).
- Subnet Mask:
- Configure the appropriate subnet mask (e.g., 255.255.255.0 for most networks).
- DNS:
- Set the domain name server (DNS) as required by the network.
Step 4: Router Configuration
- Ensure the router manages IP distribution for all devices on the network.
- The display’s IP address must remain outside the DHCP range.
Example Configuration for Smaller Projects (Up to 45 Apartments):
- Router DHCP Server Start Address:
Set the DHCP server to start distributing IP addresses from, e.g., 192.168.1.100. - Static IP Range for Displays:
Assign static IPs below the DHCP range, e.g.:- Display for Apartment 1: 192.168.1.1
- Display for Apartment 6: 192.168.1.6
- Display for Apartment 45: 192.168.1.45
By following these steps, the intercom system will function seamlessly, avoiding IP conflicts and ensuring reliable communication across the network.
Pierre SPRINGFIELD Setup
Every Pierre Display Requires a Fixed IP Address
For optimal functionality and reliable performance, all Pierre displays must be assigned a fixed IP address.
This ensures seamless communication and avoids potential conflicts within the network.
Setup in Pierre Partner Application
Menu - Intercoms - Add
Select the Pierre Intercom
Choose the Pierre Intercom from the available options.
Configure the Intercom Settings
- Name: Enter a custom name of your choice.
- Role: Select the appropriate role for the intercom.
- Doors: Specify which doors can be opened by the intercom.
Save the Configuration
After saving, click on the newly created intercom to view or modify settings.
Access Parameters
Navigate to the Parameters tab to find the configuration settings for the Pierre Intercom. These settings are automatically generated by the system and can be adjusted as needed.

Setup the Pierre Springfield Intercom:
- Default Network Configuration: DHCP
By default, the Pierre Springfield intercom obtains its IP address from the DHCP server (managed by your router). - Connect to the Network
- Connect to the network by Wi-Fi or Ethernet with your notebook or computer.
- Scan the network using an IP scanner (e.g., Angry IP Scanner) to identify the intercom’s assigned IP address.
- Access the Intercom’s Web Interface
- Open a web browser and enter the identified IP address.
- Default login credentials:
- Username: admin
- Password: admin
- Important: Change the default login credentials at the end of the setup process and record the new details securely.
Configuring SIP Account Settings
In the intercom’s web interface, set up the following parameters under SIP Account Settings:
- Username: Enter the extension from the Pierre Partner application.
- User Name 1: Enter the username from the Pierre Partner application.
- Server Password: Enter the password from the Pierre Partner application.
- Server Address: Input the server address provided by Pierre Partner application.
- Server Port: Set to 55061.
- Transfer Mode: Select TLS (Transport Layer Security).
Configuring Contact Settings
- Navigate to Address Book under Contact Settings.
- Add a contact:
- Remark: Provide a name (e.g., Apartment 1, John Doe).
- SIP: Enter the SIP address in this format:
sip:1@display-ip-address
Call Settings
- Configure the Call Behavior:
- Short Press: Assign the contact from the address book to the button’s short press.
- Long Press: Assign the same contact for the long press.
- Save the settings and test the functionality to ensure the intercom calls the intended recipient when the button is pressed.
Assigning Fixed IP Addresses to Displays
Step 1: Access Network Settings
- On the display, pull down the status bar from the top of the screen.
- Connect the Pierre display to the internet using a Wi-Fi network (this is optional and not required for door intercom functionality).
- Use Ethernet for internal network communication of the intercom system.
Step 2: Configure Ethernet for Internal Communication
- Use Ethernet for internal network communication with the intercom system.
- Check Primary network. There are two ways to configure this:
- If the displays only have LAN access, it is essential to enable the Primary Network in the display’s Ethernet settings.
- Alternatively, if the apartment has its own internet access via a Wi-Fi network, and the Ethernet connection is used for the intercom on the display, then the Wi-Fi network must be set as the Primary Network in the Wi-Fi settings.
- Navigate to IP Settings and select Static.
Step 3: Assign Fixed IP Address
- IP Address:
- Assign a fixed IP address that is outside of the DHCP range to avoid conflicts.
- Gateway:
- Enter the IP address of the network gateway (typically the router’s IP address).
- Subnet Mask:
- Configure the appropriate subnet mask (e.g., 255.255.255.0 for most networks).
- DNS:
- Set the domain name server (DNS) as required by the network.
Step 4: Router Configuration
- Ensure the router manages IP distribution for all devices on the network.
- The display’s IP address must remain outside the DHCP range.
Example Configuration for Smaller Projects (Up to 45 Apartments):
- Router DHCP Server Start Address:
Set the DHCP server to start distributing IP addresses from, e.g., 192.168.1.100. - Static IP Range for Displays:
Assign static IPs below the DHCP range, e.g.:- Display for Apartment 1: 192.168.1.1
- Display for Apartment 6: 192.168.1.6
- Display for Apartment 45: 192.168.1.45
By following these steps, the intercom system will function seamlessly, avoiding IP conflicts and ensuring reliable communication across the network.
")


")


| Position | Wires | Diameter | Type | Comment |
|---|---|---|---|---|
| From PIERRE to Smart Intercom | 1 | cat.5 | UTP | 12 V, GND |
| From Smart Intercom to Network Internet | 1 | cat.5 | UTP | +12V, GND, SIGNAL |


What happens if the internet goes down?
The system will continue to function locally without internet access, but remote access (such as controlling devices from a phone while away) will not be possible.
Does the intercom support PoE power supply?
Yes, depending on the model, the intercom can support Power over Ethernet (PoE). Please check the product specifications for confirmation.
Is an indoor intercom unit required?
If you're using PIERRE displays, a separate indoor intercom unit is not needed, as the displays can function as indoor intercom units. The PIERRE app on mobile devices can also act as an intercom.
Will the intercom work without internet?
Yes, the intercom will still function locally without internet access, but you will not be able to receive intercom calls remotely from outside the local network.
Will the intercom ring on my phone if there is no internet?
No, the intercom will not ring on your phone without internet, but it will still ring on the indoor display unit.